Friday, April 19, 2013

Sunrise Series - Updating!


It's not QUITE an epic fail.  The photos have been happening, but the posting has been neglected.  I swear going back to work full time has been a bigger adjustment than I realized.  I'm still struggling with figuring out how to get everything done in a day...and the school year is almost over, so it's almost a moot point! 


Anyway - I finally slogged through my photo disks and made my selections, so here they are - oldest at the bottom, newest at the top.  


And I promise to try to do better!  


Sunrise Week 15
April 12, 2013


Sunrise Week 14
March 31, 2013


Sunrise Week 13
March 27, 2013


Sunrise Week 12
March 19, 2013


Sunrise Week 11
March 12, 2013


Monday, April 15, 2013

Song Of Spring

It's April 15 - which is tax day, but more importantly it's The Paper Mixing Bowl's reveal day!  I've been sitting on this project for a few weeks, and I'm so excited to get to finally show it to you! 

First off, some background.  

At PMB, every challenge includes a recipe card, which has the challenge specs, a sketch, and some journaling or topic ideas.  Here's this month's card : 


As you can see, it's all about spring and pastels this month, which was really tough for me.  People who know me well know that I love working in the fall color palettes.  For me, any color, as long as it is rich and dark is a winner.  Pastels - man - not so much.  But I'm all about the challenge of stretching myself and working outside my creative box, so I went rummaging through my paper stacks and found a piece from the Webster's Pages "A Sweet Life" collection, another from the Graphic45 "Once Upon a Springtime, a third from the DCWV "Mariposa" collection, and finally, I found one of my beloved polkadot patterns in a stack of MME "Wild Asparagus" collection.  I'm just not ready to START unless I have a polka dot pattern in the mix! 

Papers in hand, I grabbed the gesso and dressed up a chipboard birdcage, fussy cut the little bird out of the Websters paper, and used my Tim Holtz WordPlay die to cut some title letters.  I strung the title on a piece of cotton string, then went rummaging through my flower box to see what might be lurking and waiting to play with my papers.  

I hit pay dirt with some old Prima Camelot roses in pale peach and pink tones.  I grabbed some mini roses that I'd found in the $1 bin at Michaels and dressed those up with some peach tone stickles.  Finally I used some music paper (not sure what the manufacturer was), sprayed it with some sunflower glimmer mist, and cut myself out some 3-d wind up roses.  I love making those.  They all have individual personalities, and it's so fun to see flat paper become a three dimensional piece of floral wonder!  

All that was left to do was ASSEMBLE.   I did a decorative corner punch with a Martha Stewart Wild Flowers deep edge punch, and then I added some final touches.  I dressed the raspberries with some Glossy Accents, created a hanger for the birdcage with some dimensional paint, gave some life to my florals with some wired jewel stems and silk leaves, and used a couple of pop dots to get that bird up in the air.  I even STAMPED on this project!  It's a creative miracle!  

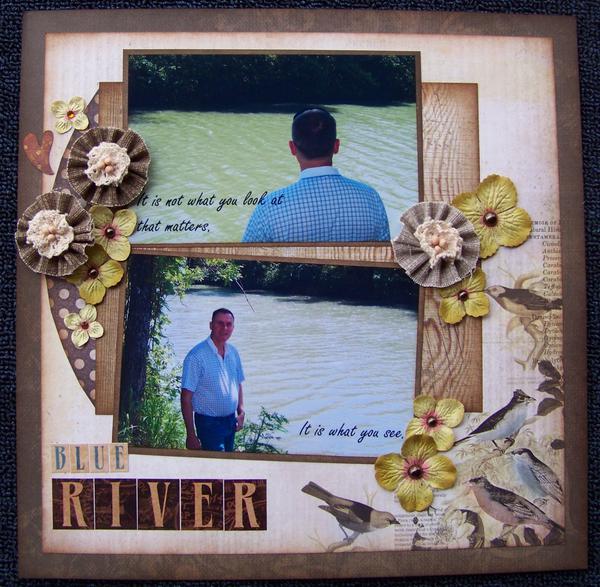
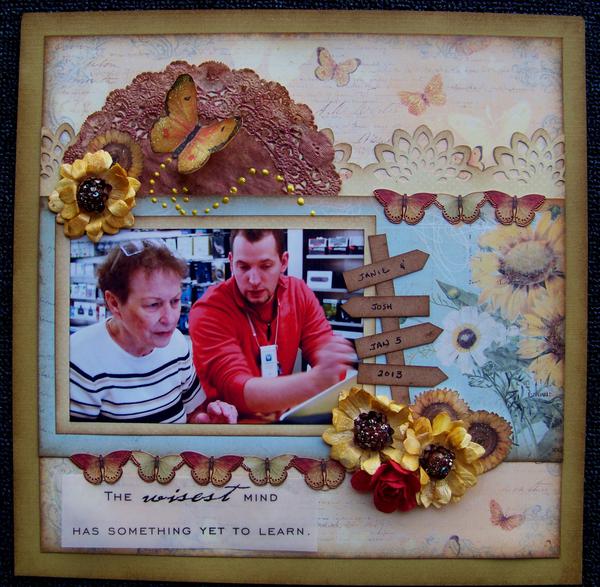
Here's what ended up coming out of my fingers.  


The photo of the robins doesn't even begin to capture the event.  There were literally hundreds of them in my back pasture.  The ground was damp from a fresh rain (Thank You, God), and the birds were having a grand time scratching for bugs.    

I love Spring - the sun is warm, the breeze is cool, hope is alive, and anything is possible.  

Thanks for stopping by, and if you get some time this month, you should try your hand at the Paper Mixing Bowl Challenge for this month.  Grab the link over on the right side of my blog and it'll take you right there!  


Monday, March 11, 2013

It's Not What You Look At...

It's reveal day at Nuts About Sketches.  Here's my interpretation of Sketch #256.  I really do love working with Shawn's sketches - they're so fluid and user friendly.  My Nuts About Sketches projects always turn out great because Shawn's already done all the thinking. I just have to pull out the product and put it together.


I've got a mix of old and new here. The flowers are Primas and have been in my stash forever. The papers are Kaisercraft and are new. The letters come from Graphic45 and they're old. 

Another "old" is the man in the photos - my darling husband of 24 years now.  Every year with him just gets better.  I could not have found a more perfect life companion - he is the string to my kite, keeping me grounded, helping me achieve my dreams by making them more realistic realities.  He is a great conversationalist, has a warm, kind, and loving heart, and has a fun sense of adventure.  Every day with him is a new discovery.  

The photos are from a visit to Blue River last year. I was doing a scrapbook series on the 23rd Psalm and I had a "still waters" image in my head that only THIS particular place could make work.  True to his adventurous spirit, Tom agreed to a day drive, and off we went, taking Cowboy along of course.     

We had a great time. I had my new camera and was learning how to play with the features, but I think Tom had more fun than I did.  He took a quick skinny dip under the bridge. Me, I sat on the bank and played lookout.  I told you he was an adventurous soul!  


Saturday, March 9, 2013

Sunrise Series - Week 10


March 3, 2013

Dawn is the time when nothing breathes, the hour of silence. Everything is transfixed, only the light moves.”
~Leonora Carrington

Hard to believe but 2013 is 20% over this week.  Today is a gift, grab it, and do something you've been putting off!  

Monday, March 4, 2013

Nuts About Sketches - Design Team Round Two!


I love working with Shawn and using her sketches to create beautiful projects, so I'm honored and excited to be invited to continue with my Design Team position at Nuts About Sketches.  This layout is one that I turned in with my application.  

My mom, age 74, retired before personal computers were standard issue for teachers, and she really only uses her home computer to play solitaire. But recently my sister and I decided that her rich knowledge of the Bible and her incredible teaching ability needed to be out in the world.

Mom has, for years, wanted to write, but her health issues with her cancer recovery and an old heart surgery, coupled with her age, make sitting at a desk for long periods not really an option. Blogging seemed to be a perfect solution. But to do that, she was going to have to enter the computer age and buy a laptop. My sister said, "ONLY a Mac - nothing else. And you'll have to talk her into it. She won't listen to me." So, it fell to me to bring mom into the computer age.

At first, she resisted the idea, but surprisingly, only for a couple of minutes. I told her, "we'll get you a laptop, and a lap desk, and you can do it from your recliner. You sit there watching television anyway, and you can do this at the same time." Then there was a whole conversation about the logistics. Mom, and if you knew her you'd laugh, had very clear ideas of what her keyboard and her screen needed to look like. I said, "ok, let's just go to the Apple store and see what's there, and we'll find what you need."

I did a quick internet search for lap desks, and found that one that would work that we could pick up in the same mall as the Apple store, so I met mom in Tulsa and we looked first at the Mac Books. Mom got a little excited when she saw how simple they would be to use. But before we bought it, we measured it and then went upstairs to Brookstone to check the lap desks. I almost lost her when I sat her down in the big massage chair to rest a few minutes. She took a sales tag and asked the sales clerk, "do you deliver..."

The lap desk was perfect -which I knew because I'd researched and found the #1 best one out there - and she bought it. Then we went back down to Apple and she bought her MacBook Pro 15 inch retinal display, top of the line model. Then she signed up for the One to One program.

Since early December, I've been driving to Tulsa one day a week, meeting mom for lunch, and going with her to her One to One lesson so that when she forgets what her tech tells her, she can call me and I can help her with it. But she's a good student, and she is learning fast.

This photo is of her and her favorite tech, Josh, who looks for her name on the list when he's scheduled because if she's on there, he wants to work with her. I think that makes him one of the sweetest guys on the entire planet.

And as a pure bonus for me. When my DH asked me what I wanted for Christmas, I said, "A MacBook Pro" and he took me to the store and bought me one. So now I do a little one-to-one myself.

If you've gotten this far, thanks for listening to me ramble on (and on and on).

Saturday, March 2, 2013

Sunrise Series - Week 9

March 1, 2013 


"The breeze at dawn has secrets to tell you. Don't go back to sleep." ~ Rumi


None of the sunrises this week has been what I would call spectacular.  We did get rain one morning, thank-you, God.  And one morning was totally cloud covered so the rise was just a plain gray gloom.  

But weeks like this remind me that God expects us to take time to just find PEACE in our hectic and frantic lives.  Take time to remember that it's not all about the spectacular.  Sometimes the simplest thing can be an ordinary miracle.    

Saturday, February 23, 2013

Sunrise Series - Week 8

February 23, 2013 

The night wrapped them; nothing broke their sleep, until, the birds beginning and the dawn weaving their thin voices in to its whiteness” ~Virginia Woolf 


The birds here are cold this morning and waiting for the warmth of the sun to help them get their songs started.

Truthfully? I wasn't sure there was going to BE a decent sunrise photograph this week. I'm ashamed to say that I had no faith - I should have known better. God is in control of the sunrises and he WILL be glorified, when and where HE chooses. Hello, sunrise. Good morning, God.

Monday, February 18, 2013

Art Journal ? - Swirlydoos Round 5 Project

Our assignment this past week was to create an art journal.

I'm not an artist. I don't draw, and I don't see art in my head.  I love to scrapbook because it allows me to create a beautiful art project with limited artistic skill.  

I had a good go at it, and more importantly, I had LOADS of fun.  My whole journal, however, ended up looking like a 6th grade art project.  I kept hearing, "it's YOUR art..." and, well, I DO teach 6th grade...

I'm pretty sure I'll get kicked this week.  I'm not kidding when I tell you that I really, REALLY did not have clue ONE about what I was doing.  And the other projects were SO incredible, it's fair I should go... 

I have to say, though, that this will probably be something I'll continue to play with because it really IS a lot of fun, and since I'm not a card maker, I might as well be an art journalist.  

This was one of three page spreads I did. It was my favorite of the week, so I figured I'd load it and share it here.  

I mean - it's ART, right? 


The sand is bead gel with paint. The bricks are modeling paste with metallic paint. The wind - that's just a doodle around a mask with some stickles to bling it up a bit. The water is done with a scallop punch and layers of paper.   The sailboat is some paper piecework.  I used a clip art shape as a model and some old canvas paper for the sails.  The wave is a chippie, colored with some Lindy's Mist.  I do love Lindy and her mists!  The clouds are gesso.  And yes, that's a toothpick you see on the bow of that boat.    


If you want to see what a REAL art journal looks like, go take a peek in the Week 5 Contest Gallery at Swirlydoos.  There are some AMAZING projects over there.  

Swirlydoos Ultimate Design Challenge - Week 5 Gallery


Heaven Whispers


This is my DT reveal for this week's Nuts About Sketches. Awesome sketch - perfect to play with that sunset image and these wonderful old papers from BoBunny's Forever Fall line. 


It's also week 4 of my Project 52 for 2013. Yeah, I know. I'm behind. A lot. But with sunsets like this one on my doorstep, who can blame me?

I'm also going to submit this to the Hoarders Challenge on Scrapbook Dot Com.  The papers are from BoBunny - Forever Fall line. I bought them to do up a Blessing Book for 2011. I ended up using something else, so these papers have just been sitting in my stash.I've also been hoarding the text rub-on for well over a year, possibly longer. I've had it so long I've forgotten just when and where I found it. I've been waiting for the perfect photo to use it with. This one was it.The dragonfly bling - that was a left over piece of an old bling flourish - I couldn't bear to toss it out. I thought, "you know, I bet I can use that one of these days..." I've had it a LONG time. The last layout I used black bling flourishes was on a couple of layouts in June 2010 (My Girls and Beautiful). So this piece is at LEAST that old.

Thanks for sharing my porch view with me!

Saturday, February 16, 2013

Sunrise Series - Week 7

February 11

"Morning Glory is the best name.  It always refreshes me to see it."
-Henry David Thoreau


Someone asked me once if I Photoshop my Sunrise Photos.  My answer, "Why would I try to improve on what God has already done?"

Friday, February 15, 2013

Paper Mixing Bowl - Red Velvet Cake

It's reveal day at the Paper Mixing Bowl.   

Wow, what a great sketch and recipe card this month!  It's a Red Velvet Cake with oodles of gooey frosting, spills, and stains.  I had a great time playing with the sketch.  I knew as soon as I saw it exactly how I wanted my project to turn out.  I'm so excited to show you my February "Valentine," even though the photographs are from last Christmas.  


Here's the recipe card.


Utensils I used
*Layers - I think there are twelve layers in this project, counting the layer of paint from the Martha Stewart doily silk screen and the title font letters.  
*Frosting - I used a gloss gel medium to get enough sticky for those glass beads to want to stay on my page.  I kind of globbed and smeared it like frosting along the top to look like drips.
*Pairs - Two pairs of photos:one pair looks left, one pair looks right.  Two pairs of small roses in each cluster.  One pair of white tulle in each flower cluster.  A pair of spilled beads, one spill on the top, one on the bottom.  A pair of doilies.  A pair of glitter heart brads. 
*Postage Items - I used a Post Card stamp.  It's stamped in brown and embossed in clear.  
*Spills - I misted my photo mat paper really heavily and then stood it on end so that it would run down the paper and look like a spill.  I spilled mist onto my craft mat and used it to wet my paper so that I could crinkle it up and then dry it out flat to create all those beautiful creases.  I spilled the glass beads all into the gloss gel.  And I tried hard to create a look of spilled frosting along the top margin of the paper.  
*Hearts and Flowers - Large and small roses, metal and glitter heart brads.  
*Multi-Photo - My muse is my beautiful older daughter, being herself, last Christmas.  

I went with the journaling prompts of "love letter" and "poem."  The mat and post card papers are word prints.  And the poem -- well, it's kind of a subjective interpretation, but I kept hearing the theme song from Lady In Red with Richard Gere and Julia Roberts...It inspired my title and that swinging red dress charm.  


Tuesday, February 12, 2013

Canvas Art - Swirlydoos Round 4 Project

So, as promised, here's my canvas project from last week's Swirlydoos Ultimate Designer Challenge.  

I've never even attempted such a project before, but Lisa is an awesome teacher and the video tutorials that she put up were AMAZINGly helpful for a total novice like me. It's a credit to HER that I was able to create this piece of pretty.  Thanks so much Lisa, for helping me get this project out of my head onto the canvas. 


Before I explain HOW I did it, let me tell you what it is and WHY I did it...

This canvas is a gift for my mother.

I am one of five children, four living. My parents lost a baby to SIDS at nine days old. Her name was Amy Susan and she died the day before my fifth birthday. She would be 52 this year. My younger daughter is named after her.

She was here such a brief time and it was so long ago that it's almost like she was never here at all. We never mention her, and yet her small but short life made a major impact on my parents.

My mother was 23 years old, my dad 31. Daddy was a US Marine, a fighter pilot, in charge of a squadron of other pilots, competent and sure of everything. Mom was busy keeping house and raising children, teaching Sunday School, hosting teas for other officer's wives.

Before Amy, my parents had a very clear idea how things were supposed to be. They expected life to follow certain rules and order. They had plans for the future - both theirs and their children's. After Amy, they both realized that sometimes children don't live to grow up. Their perspective about the future changed, and they both became better parents. My 'father' became my 'daddy,' and my mother found time to sit and play and hug us every opportunity she had.

As my mom has gotten older, she has begun talking about Amy, about how this little angel changed her life - how in one second, everything she knew for sure became nothing for sure at all. How the few short days she was with us changed ALL of us for the better, in spite of the incredible pain of loss.

There are no photographs of my second sister. The only mementos of her life are a photo of her grave and a small piece of ribbon, left over from the dress my mother buried her in.  A few years ago, I asked my mother for the ribbon from that dress. 

I had this idea in my head - just an idea really, nothing solid or formed - but some way to create a small memory of a short life that was part of my life, just for a few days, but made everything about the way I grew up different than it might have been if she had lived.

So to start, I chose a small canvas (8x8) to create my project - as a symbol of a small life, gone much too soon, before it even had a chance to BE a life really.  The ribbon on the bottom is the ribbon from her dress. And on the back, just for my mom to read, are these words...


What kind of place would heaven be with all its streets of gold,
if all the souls, that dwell up there like yours and mine were old?


How strange would heaven’s music sound when harps begin to ring,

if children were not gathered round to help the angels sing.


The children that God sends to us are only just a loan,

He knows we need their sunshine to make the house a home.


We need the inspiration of a baby’s blessed smile,

He doesn’t say they’ve come to stay, just lends them for awhile.


Sometimes it takes them years to do the work for which they come.

Sometimes in just a day or two our Father calls them home.


I like to think some souls up there bear not one sinful scar.

I like to think of heaven as a place where babies are.

**********

Now, here's how I did it. 

I prepped the canvas with glimmer mist in Snow Angel, Sunkissed Peach, Frost, and Patina. I was going for an "earth to heaven" color blend. 

I used molding paste for the wings, created with a stencil. The stuff on the bottom is called glass bead gel, bought at Michaels in the art and paint section. It's my NEW favorite goop!

I set it aside for the night to dry.

When everything was dry, I dry brushed the wings and the Bead Gel with some Metallic Pearl White paint by Folk Art. I also used some Baby Pink Metallic by Martha Stewart as well.

I stamped the clocks and embossed them with a soft peach embossing enamel. The cherub is a transparency print. I knew it would bleed a bit when I sealed the canvas, but I think that I like the way it ended up, soft at the bottom and clear at the top.

I sealed with Martha Stewart's glitter finish, another really COOL goopy item!

And another drying wait.

Then I top dressed the wings again with the Metallic White and finally used a white gelato stick on both the wings and the bead gel.

The chipboard is prepped with DecoArt Metallic Festive Green paint, run through my dotted swiss embossing folder.  Then I sanded the tops down, used some Peeled Paint ink and then some Metallic Chalk Rub to finish.

The fiber is a medical gauze roll. I pulled the fibers apart to make it more wispy and then treated it with a Baby Pink metallic paint wash. I tied the little dress ribbon in a bow, then tacked down the ends, kind of bunching and gluing as I went.

The little crochet butterflies started life white, but I gave them a bit of a dressing with some Picked Raspberry ink. The pearl bling finished everything up and I was done.

I am so pleased with how this turned out. I cannot wait to give it to my mom.

Saturday, February 9, 2013

Swirlydoos Ultimate Design Challenge Week 4

Stay tuned.  It's a gift for mom and I want to keep it a surprise.  As soon as I give it to her this coming Wednesday, I'll show the rest of my world.  

If you are REALLY anxious to see it, you can check out my facebook page or go check out my gallery at Swirlydoos or Scrapbook.com.  Those are sort of secret since my mom doesn't Facebook or watch my gallery posts.

Meantime, here's a look at the chaos that used to be my scrap desk.  I'm pretty sure my desk is still under there somewhere.  I'll have to get it cleaned up pretty quickly.  My Paper Mixing Bowl project is due early next week! 


Sunrise Series - Week 6

February 3

"...Day and night meet fleetingly at twilight and dawn...And their merging sometimes affords the beholder the most enchanted moments of all the twenty four hours. A sunrise or sunset can be ablaze with brilliance and arouse all the passion, all the yearning, in the soul of the beholder.” ~Mary Balogh


Saturday, February 2, 2013

Sunrise Series - Week 5

January 28

But tomorrow, dawn will come the way I picture her, 
barefoot and disheveled, standing outside my window
in one of the fragile cotton dresses of the poor.
She will look at me with her thin arms extended, 
offering a handful of birdsong and a small cup of light. 
~William Collins


Swirlydoos Ultimate Design Challenge Week 3

Want to see what's been keeping me busy this week?  I mean besides substitute teaching and feeding everything with a mouth around here?

I made the Round 3 cut for the Swirlydoos Ultimate Design Challenge and got to play for another week.  This week's project was courtesy of Miranda - who expected us to ::GASP:: work with METAL!  Oh dear.  Does she not know about my long standing feud with all things steam punky and industrial?  In fact, I have such a hard time with this particular genre' that I've invented my own signature style and named it "Country Punk" just in desperation to prevent being laughed out of next county. 

No matter.  Metal foil tape, embossing, and altered items.  That was the assignment, so up with the rolling of the sleeves, and down with the lump in my throat, and into the mucky mess with my fingers, and out came ....

this.  Which is not so bad, if I say so myself.  Turns out - it really was super fun.  But once again, steam punk and I have agreed to part ways in favor of a more "country" flair.  My signature "Country Punk" strikes again!  


It's a metal coated mini album covered with bits and pieces of things I love and things that I mostly wanted to get out of my bottomless stash of bits and pieces of things.  

The little wood fence lifts up.  Under, there is a little red glittered heart and some ribbon grass.  Eventually, this will have a picture of Cowboy as well. 


The little flower in the heart is one of Amy's earrings.  I found it in the bathroom drawer after she moved out.  There was only one, not a pair, and I could not bear to throw it out.  I knew I'd find a use for it.   Turns out...


The little metal butterfly is tethered to the family word.  I think that's kind of symbolic.  Everyone needs to find their wings, but our family keeps us stable and secure and grounded when the wind gets too strong and we need a safe resting place. 


The feathers are courtesy of my chickens and the bluebirds that live here in the summer.  The bingo numbers - lucked out with those.  They're our house number! 


Monday, January 28, 2013

Obama, Congress Restore Horse-Slaughter Industry

It's about time.


Slaughtering horses is a touchy subject. But as a horse owner and lifetime horse lover, I feel like I can comment on the subject with both my heart and my head. For the record, I am morally opposed to slaughter, but I can afford to be.  I am a responsible horse owner. I don't own more horses than I can afford to take care of. My male horses are gelded, and I have no plans to breed my mare. 


Horses have a shared history with man, working alongside him in the capacity of machine before there were steam or diesel engines.  Horses were the early day embodiment of tanks, the tractor to pull the plow, the ATV for rounding up the cattle, the tug boats for pulling barges along rivers, the train for moving people west in stagecoach, the fed-ex airplanes of their day in the clothes of the Pony Express, and even today they serve as the police vehicle for crowd control in many cities. Wherever you find the history of man, you find beside him the horse and the dog.


But.

Horses aren't house pets. They aren't even backyard companion pets. There are city ordinances against keeping a horse in your backyard in most  residential neighborhoods.  Horses are classified as livestock, the same designation as cattle, pigs, goats, and chickens. True that their role as livestock is very different from that of the animals we Americans eat, but that's because their historical and emotional value to us goes beyond their value as a meat animal.  Regardless - they are livestock just the same. 

At the same time, I love my horses and I am horrified by the problem that closing the plants in the United States 6 years ago created. There is a huge problem with unwanted horses in this country. They went from being a champion cause for PETA during the debates for closing the plants to a complete nightmare for local equine rescue organizations, who haven't got the resources to house the huge increase in unwanted horses that now have no bottom dollar value. 

Do a google search for equine rescue.  They'll have "before" pictures of their current adoption animals.  Those photos are graphic and you'd best have a strong stomach before you look.  Here's the link to my own local rescue - Blazes Equine Rescue - who are doing an amazing job in the face of overwhelming odds.  

The problem is currently the same one as the one we face with abandoned kittens and puppies, with the exception that horses are usually contained and more visible, and owners who can't support them just leave them to fend for themselves. The number of cruelty cases has skyrocketed. The number of neglect cases is unbelievable. The number of horses living unseen miserable, invisible existences is beyond my ability to even comprehend. At that's just in my own state. Multiply that by 50.

The anti-slaughter coalition's solution, "just don't breed," was about as successful as the current campaign for "new gun legislation." You can't tell free Americans what they can and cannot do with their property and their civil rights.

The tragedy is this.  American horses are still going to slaughter. The original legislation simply removed the provision for federal inspections of the American processing plants.  Without inspection, the meat could not be sold.  But that did not eliminate the market demand.  So horses in the northern parts of the United States have been transported to Canada.  Those living in the southern part of the United States have been transported to Mexico. 

Transport is a euphanistic word for "traveling long distances in overcroweded trailers packed in like sardines with no rest stops and no water for the duration of the journey.  Animals lucky enough to arrive alive are met with crowded conditions and minimal if any humane care for injuries sustained during the long journey to their last stop.  

What has been happening to American horses in most of the Mexican processing plants is cruel and inhumane. There is no "captive bolt" or "quick death." There is a butcher knife shoved through the top of the neck and into the spinal cord, then the animal is strung up, still conscious, to bleed out.  There's video available on You-Tube if you have the stomach for it.  I couldn't watch it.  The first images are still giving me nausea and nightmares.  

Mexican Equine Slaughter Plant Footage

I'm not a crusader.  You won't find me sending money to PETA.  I don't make a difference in the lives of any horses but the ones that come in contact with me.  But now that you know, you need to think about where you stand on this issue.  And my stand is this: 

By making it possible for the processing plants to reopen in America, we are at least providing the opportunity for our unwanted horses to meet a dignified and humane end, with a continued usefulness and service to us after their lives are over. And that's infinitely better than a miserable life.

I'm going outside now and give Java, Charlie, and Buddy a hug.


Reference Links : 

Idaho Horse Council
Washington Times
Temple Grandin


Saturday, January 26, 2013

Swirlydoos Ultimate Design Challenge - Week 2

Hi everyone.  

This is my second project for the Swirlydoos Ultimate Design Challenge, which means that I made the first round cut!  I'm so excited - because the competition and talent is FIERCE.  This challenge is definitely a mojo stretching, creativity inspiring, pull out all the stops, pedal to the metal kind of competitive series.    

Our video inspiration tutorial was hosted by Rae this week. Rae is into layers - the more the better. Not surprisingly, our assignment then was to create a layered project. Rae didn't SPECIFY how many, so it turned into a really fun competition between participants of "just how many layers can you GET on that page of yours anyway?"

First item of business, I needed to pick a photo to work with.  

My sister and I went to Italy in October, and we made a point to take a "sister picture" at every major stop. This one is at the tower in Piza. The photo - my sister was my matron of honor and I was hers. We did this same photo at both of our weddings - 25 and 30 years ago. I thought about doing a then and now thing, but this photo is really for my Italy vacation album, so I'll save that idea for another time.

I actually already scrapped this photo once for my mom's mini album. But I wanted to do a layout of it for my own album, so I've been looking for the right set of circumstances to line up. This week, they did.


I'm going to play this project in a couple of additional challenges at Scrapbook.com.  The first is the Book Of Me Challenge which Char hosts.  The assignment this month was to scrap a milestone.  If a trip to Italy for a country girl from Oklahoma isn't a milestone, I'm not sure what is. It was also the first time my sister and I had shared a room since we were kids. It was so fun to find out that we could be friends as well as sisters. I had such a GREAT time. I mean, yeah it was Italy, but I went with my SISTER. How cool is THAT?

And I'm also going to submit it to Kimberly's Stamping On Your Layout Challenge because I did. Honest. I stamped some script writing on these papers in a couple of places - but I don't think that it shows up too well in the photo. Look really hard at the right edge of the brown polka dot paper and MAYBE you can see some of it. There's more, but the dark ink just doesn't show up well on the dark paper. You can see it in the real life version, but its subtle.


*************

TECHNIQUE DETAILS - for inquiring minds...

Day One was all about the papers. First item of business was that BoBunny Weekend Market collection. That was a total no brainer.  As far as I'm concerned, BoBunny knocked it out of the park with this paper line. It's one of my all time favorites - right up there with Kay & Co's Blue Awning.

I stopped counting paper layers at 11 because that's my lucky number, but I think that there actually ARE eleven layers of paper on the basic bones of this project. The mist work on the doily is Lindy's Buccaneer Bay Blue Moon Shadow Mist. (Moon Shadows are my FAVORITE Lindy's product.) 

Then I let the project marinate overnight.  It needed a serious time out.  It was arguing with me about flowers.  I wanted to use some fabric burlap and organza ones.  My layout wanted to live with cluny lace and wind up roses.  It was being seriously bossy about it too, and I just couldn't deal, so I left it all by itself overnight to think about the consequences of its choices.    

Day Two - I figured since the project was about layers, and since my project and I were STILL arguing about flowers, I decided the embellishments could stand a little layering too.

First is the little Italy stamp in the memo pin.  I had two of those stamps, so I cut one out with my stamp scissors, put it onto some chipboard, then put that on top of the other stamp, so it's a layered embellishment. The doily clock is another one. The doily is a diecut by StampinUp, cut from a BoBunny Double Dot paper.  Then I used an OLD Heidi Swap clear clock from my stash (Roman Numerals, of course), some metal clock hands (from Michaels sale aisle), and finished with a vintage brad (also StampinUp from my stash). And the little journaling block is also layered. It was a clear sticker which I stuck onto the BoBunny Double Dot, then layered a Tim Holtz tile fragment on top of it.

I did the Dusty Attic flourishes (which are ALSO my favorite) with some modeling paste, brown smooch spritz (Log Cabin) darkened with Walnut Stain reinker, and then some Lindy's mica powder in Tibetan Poppy Teal on top when it was dry.

Day Three - down to the wire. I sat down to have a serious discussion with my project about the floral embellishments.  I tried my very hardest to convince it to play nice with those burlap and organza flowers. I had visions of burlap in my head and I just couldn't understand why my layout didn't share that vision.  But its response went something like, "are you KIDDING? SERIOUSLY?" I whined a little and tried to explain that the cluny lace flowers it wanted me to create were going to be too much work - that they involved needle and thread and figuring out center pieces... My layout didn't care. It said, "this photo - it matters to you. A lot. It really deserves the best you have in your arsenal. Now shut up and get after it."

I've learned never to argue with your project. You can't win. Better to let it be the driver and you just ride shotgun and help it steer.  Cluny lace and wind up roses it is.

The wind up roses are done with Tim Holtz's tattered pinecone die. The big flower is an old Prima, color changed courtesy of the Buccaneer Bay Blue mist. The smaller ones are hand done with cluny lace, colored up with Stormy Sky ink, and then finished with some of the Lindy's Teal mica. I layered those with a couple of metal brad flower enhancements (I'm not sure if that's the right word - they're metal flowers that are designed to have brads stuck into them), then stuck some small stamens in them to make them behave like real flowers. I had to enlarge the hole in the metal with my crop-a-dile for the stamens to fit through. The tiny roses came from the dollar aisle at Michaels. They started their lives white, but once I pull out the Moon Shadow, NOTHING is safe anymore.

Only thing left was the green ferns from a floral stem and some floral stem winds - really small gauge stuff - and it was done.

So, yes, it took days, but you know - sometimes the end result is worth the time investment. This was one of those times. I'm so happy that my layout was so hardheaded about those flowers - because in the end, it really did know what it was talking about.  I could not be more proud of how this project turned out. 


Sunrise Series - Week 4

January 21


We watch the dawn remaking the world in its antique pattern.
~ Oscar Wilde


Venus has been in the morning sky this month, but this sunrise was the only one where I managed to get her on film. It's not the most glorious sunrise I've ever photographed, but I do love the transition of the blue to the gold against the horizon.

Saturday, January 19, 2013

Sunrise Series - Week 3

In my years of taking sunrise photographs, one of the things I've come to realize is that the thing that makes a sunrise incredible is cloud formations.  But it's difficult to see those in a time of severe drought.  However, every so often, God puts them there to inspire and remind me that he is in control of the heavens, and all I need to do is have faith and wait.  

Rain is coming.  Eventually. 

January 14 


Swirlydoos Ultimate Design Challenge - Week 1

Swirlydoos is having a design challenge for the next six weeks.  The prize package is absolutely over the top, but the main reason I wanted to participate is that Swirlydoos has always been the place I go when I need to feed my creativity.  I was a kit member for a long time, and Krissy is the best when it comes to figuring out what I want before even I know what I want. 

Anyway - the first challenge was to create a  milti-dimensional embellishment.  We had to start with a die cut and then turn that into a usable embellishment using at least two art mediums.  Then we had to display that embellie on a finished project. 

Man.  Talk about creative fun!  

Here's what I came up with for my little embellishment.  


I cut out a bird from the Tim Holtz birdcage die, along with two wings.  Then I covered those with modeling paste, which I textured to look like feathers.  When it was dry, I puddled some shimmer mists onto my craft mat and applied them to my bird with a paintbrush, also adding some Lindy's mica powders to REALLY bump up the shine.  I used a distress marker for the beak, and I added just a tiny drop of dimensional paint to a black bling for the eye. The flowers are from the Tim Holtz tattered flower mini strip, inked with Victorian Velvet ink, then dabbed with glossy accents and dipped in glitter.  The base is cut from a Stampin'Up die, it's just chipboard covered with paper.  Then I used a Tattered Angels stamp, clear embossed it, and covered it with Iced Spuce ink.  

I kept my layout project simple.  I plan to use it as a teaching project, and I know that class time will be taken up with creating the embellishment and flowers, so there will be little time for much else besides paper cutting and distressing.  

It's also going to be a two page layout - something I don't do very often - so that's why it's a little lopsided to the right.  

The photos are from last summer when Tom and I went to Taos.  I'm in the basket - second from the left, and yes, I was PETRIFIED!  It took a while for me to relax and enjoy the ride, but once I got into it, I have to admit that it was really fun.  Definitely a once in a lifetime kind of thing.  I'm glad we did it.  

The right side of this project is still on my craft desk.  I'm trying to get it finished this weekend! 

Tuesday, January 15, 2013

Paper Mixing Bowl Debut!

I've been sitting on this layout for a month now, and I'm so excited that I can finally show it to you.  It's my first design team project for the Paper Mixing Bowl - an online challenge forum which is open to anyone.  It's so creative and fun!  Each month Sarah and the DT put together a recipe card of technique, color, and sketch specifics, and then you get to put a layout together.  Submit it and you could earn a spot as a GUEST DESIGNER for the site.

Here's this month's recipe card.


And here's my DT project.


And a few detail photos as well.  I'm not instinctive about these close up shots yet, but if you'll bear with me, I'm sure I'll get better.  


I'll be more than happy to tell you what I did and how I did it if you'll just leave me a note in the comments section.  Thanks so much for stopping by my little blog.  Check out the other DT projects and then get your play on and join us!  I promise, you'll have more fun than you can possibly imagine!